RECONDITIONING BRAKE DRUMS AND SHOES
To insure complete contact and avoid gaps between
lining and shoe, secure lining to shoe with "C" clamp so
that rivet or bolt holes are in alignment. Position "C"
clamp as close to the holes as possible, clamping the
lining firmly in place.
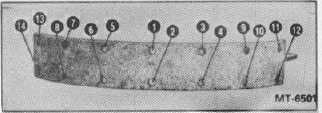
When securing brake lining to shoes, start with the
center rivet or bolt and work toward the ends as shown in
Figure 14. When securing brake block lining to shoe, use
the sequence as shown in Figure 15. Always use new
lock washers when installing bolt on lining and tighten
nuts to 89-111 N-m (20-25 ft lbs.) torque.
Figure 14 - Sequence In Securing Brake Lining to Shoe
Figure 15 - Sequence in Securing Brake Block Lining to
Shoe
When riveting linings, use a roll set to upset the rivets. A
star set may split the tubular end of rivet and prevent a
tight fit.
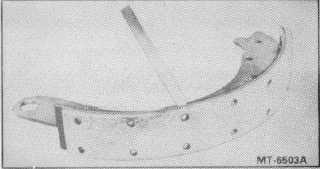
After the lining is installed, check tightness of lining to
shoe, (Figure 16) with a 0.203 mm (0.008 inch) feeler
gauge at any point along the arc of shoe and lining.
After installing the new lining on the shoes, the lining
should be ground in a true radius to fit the drum
diameter. A brake shoe grinder is provided on brake
reliner which is designed to dress the lining in a true
radius and fit the drum diameter. This grinder swings the
shoe in an arc across the surface of an abrasive wheel.
A brake shoe grinder which mounts on the spindle may
be used after installing shoes with new lining. The
grinder rotates about on its axis and the grinding head
equalizes the distance between the two brake shoe lining
surfaces
and
drum
surface
Grind
new
lining
approximately 1.78 mm (0.070 inch) less than the inside
diameter of brake drum Be sure that the brake is fully
released before grinding.
Figure 16 - Checking Tightness of Lining Using A Feeler
Gauge
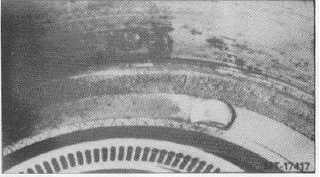
Figure 17 - Drum Bolt Alignment
DRUM REPLACEMENT
MEDIUM AND HEAVY DUTY VEHICLES
Drum replacement on medium and heavy duty vehicles
requires the removal of nuts from bolts securing hub and
drum together. The hub and drum can then be
separated.
MOUNTING NEW DRUM TO HUB
Clean exposed hub or axle mounting flange with wire
brush or coarse file. Use straightedge across surface of
flange to make sure it is not bent. Remove excess paint
from edge of drum hub hole and wash rust preventive
sealer from drum with solvent.
Before installing a replacement drum, wash the drum
thoroughly with high grade denatured alcohol to remove
all protective grease, oil or other residue. DO NOT use
gasoline, mineral spirits or oil.
When assembling hub and drum together, pay special
attention to the bolt heads so that they are aligned
properly in the drum (Figure 17).
Refer to Torque Chart for bolt tightening sequence and
proper torque values of hub to drum mounting bolts as
well as rim and wheel mountings.
CTS-4082B - Page 7


