TM 5-3895-370-14&P
b. Disassembly.
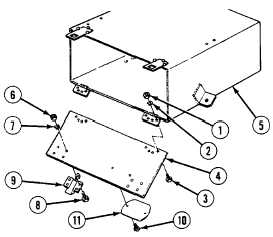
(1)
Remove six nuts (1), lockwashers (2), screws
(3), and door (4) from box (5). Discard
lockwashers.
(2)
Remove eight nuts (6), lockwashers (7), screws
(8), and two pull catches (9) from door (4).
(3)
Remove two screws (10) and reflector (11) from
door (4).
c. Cleaning/Inspection.
(1)
Wipe off dirt and debris with brush and rag.
(2)
Inspect all parts for tears, cracks, and other signs of metal fatigue.
(3)
Replace all parts failing inspection.
d. Assembly.
(1)
Install reflector (11) and two screws (10) on door (4).
(2)
Install two pull catches (9) on door (4) with eight screws (8), lockwashers (7), and nuts (6).
(3)
Install door (4) on box (5) with six screws (3), lockwashers (2), and nuts (1).
e. Installation.
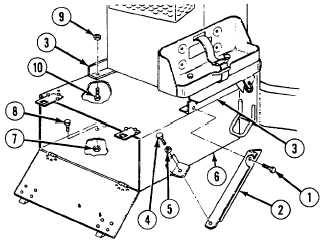
(1)
Install box on main frame (3) with screw (10)
and nut (9).
(2)
Install two screws (8) and nuts (7) on box (6)
and main frame (3).
(3)
Install brace (2), washer (5), and screw (4) on
box (6).
(4)
Install two screws (1) on brace (2) and main
frame (3).
NOTE
Follow-on maintenance:
·
Install air tank brackets (para 4-
101).
·
Install spraybar extensions (para
4-155)
END OF TASK
4-333