BEST AVAILABLE COPY
2.
Operate control hand lever to check for adequate
clearance. If additional clearance is required at
full forward proceed as follows:
(a)
Set control hand lever either side of neutral.
Loosen setscrew (19) with a 5/32" Allen wrench
and remove control hand lever from shaft.
(b)
Replace control hand lever on shaft to provide
desired clearance and tighten setscrew.
3.
Apply forward and reverse decal (32) to the control
head adjacent to neutral position of control hand
lever.
NOTE: Before stripping of protective backing paper
from decal, clean the control surface
thoroughly.
6. Connect Clutch and Throttle Cables to Engine
1. Follow the procedure outlined in the Throttle and
Clutch Connection Kit Installation Instructions
supplied with each kit.
7. Final Adjustment
1.
Operate the control head hand lever several times.
The engine clutch lever and the control clutch arm
(14) MUST coincide at forward, neutral and
reverse detent positions.
2.
The
engine
clutch
lever
position
must
be
determined only by the control cable and should
not be jammed against forward or reverse stops.
Adjust the shift cable terminal (at the clutch end
first) until detents are properly synchronized.
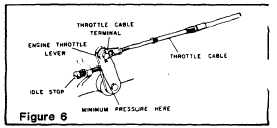
3.
Operate the control hand lever through the
complete operating range. The carburetor throttle
lever should rest lightly against its idle stop when
the control hand lever is at neutral. At neutral
detent, pull out hand lever hub and move thru
forward range. Return to neutral and hand lever
should snap back in place. Excessive pressure of
the carburetor throttle lever against its idle stop will
prevent the control hand lever from moving freely
in and out at the neutral detent. To remedy this,
adjust the engine throttle cable terminal so the
control cable will move the engine throttle lever
against its idle stop with minimum pressure. (See
Figure 6).
CAUTION
THROTTLE
CABLE
MUST
BE
DISCONNECTED
FROM
MOTOR
BEFORE
MAKING
MOTOR
IDLE
ADJUSTMENTS. Adjustment of the
motor idle while the throttle cable is
still connected to motor, may cause
a jamming action against the idle
stop. As a result, control may not
function properly.
4.
The carburetor throttle arm should be at full travel
position when the control hand lever is at full
forward throttle. In reverse, only limited movement
of the carburetor throttle arm is available. When
the throttle cable is correctly adjusted, the engine
speed will remain at idle while the control is
shifted, and will increased only when the hand
lever is moved beyond the (UNREADABLE
TEXT)
NOTE
Throttle cable requires free back-and-
forth swing clearance two to three
feet below the control head housing
for smooth operation.
Figure 6
5.
Tighten all cable supports.
6.
Check all screws, nuts, cable connections and
cable terminal for tightness.
7. Water test the boat. The control hand lever should
operate freely with light hand pressure. Any
stiffness or binding in the operation of the hand
lever can usually be traced to:
(a)
Excess number of bends in cable runs.
(b)
Sharp bend in the cables too close to control
head.
(c)
Bends smaller than the recommended minimum
radius of 8”.
(d)
Tight or misaligned engine linkage.
(e)
Cable compressed too tightly by cable supports.
(f)
Engine clutch lever jamming its limit stops at
forward and/or reverse.
8. Operation
1.
Adjust
the
engine
for
smooth
idle,
as
recommended by the manufacturer.
2.
For starting or warm-up, place the control in
neutral detent position and pull out the hand lever
nub to disengage the shift mechanism allowing the
lever to be moved forward or backward to advance
the throttle. When warm-up is completed, return
the lever to neutral detent. The hand lever will
automatically snap into the operating range. (If
lever does not engage into operating range when
returned to neutral, check for excessive pressure
of the engine throttle lever against its idle stop).
3.
When operating the “MT-2" control, shift crisply out
of neutral into forward or reverse, but do not shift
too quickly from forward into reverse. Stay in the
neutral or idle position until the boat has lost most
of its headway before completing the shift to
reverse.
9. Maintenance
1.
CORROSION PROTECTION
For maximum protection, especially in salt water
areas, wipe metallic parts, such as screw heads,
cable sleeves, etc., with oil or light grease.
Chrome plated hand lever and covers should be
washed with fresh water and waxed regularly.
2.
MECHANICAL PERFORMANCE
(a)
Periodically check control mechanism for loose
fastenings and signs of wear or moving parts,
particularly the cable terminals. Lubricate
moving parts with a good quality marine grease.
(b)
Periodically
examine
cables
and
engine
connections for signs of physical damage.
(UNREADABLE TEXT)