TYPICAL INSTALLATION
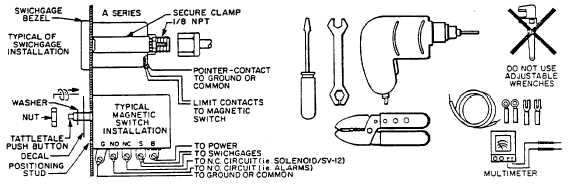
SWICHGAGEâ INSTALLATION (Refer to drawing)
1. Secure the SWICHGAGE' in the panel, using the clamp and
nuts provided.
NOTE: Be sure the SWICHGAGEâ and
panel are grounded.
2. Connect the pressure or vacuum line, using a 1/8 NPT
adaptor at the SWICHGAGEâ end.
NOTE: Be sure that pressure line is clean
and that pipe dope or teflon used on
fittings does not block the line.
3. If not in a prewired panel, wire the limit switchless) to a
Murphy magnetic switch or relay.
NOTE: Pilot duty (2 A @ 30 V resistive)
contacts must be protected from high
current: disconnect power during wire-
up.
TEST: Start equipment: wait for pointer to lift off low contact:
check readings, close limit switch(es) to alarm/shutdown;
adjust limit contact to correct limit point.
USE THE PROPER TOOLS - DO NOT OVERTIGHTEN
Murphy recommends mounting SWICHGAGE, and magnetic
switches away from excessive vibrations and the use of panel
shock mounts wherever vibration may occur. Handle all
instruments with care: although durable, these products should
not be subjected to rough handling, dropping, or severe
vibrations.
Magnetic Switches: Mount with electrical lugs down. If
necessary, drill the TATTLETALEâ and pilot-stud holes
(template provided); clean away burrs and filings. Position the
magnetic switch in the panel, making sure the pilot stud is in
place. Add TATTLETALEâ decal, then washer, then nut and
tighten.
BASIC WIRING OF SWICHGAGEâ AND MAGNETIC
SWITCH
Disconnect battery or other power during installation.
Murphy components are easily wired-up and maintained.
Use good quality wire and terminals. Be sure all connections
are Clean, Complete and Correct. The wiring and the type of
magnetic switch differ for various applications, but a knowledge
of basic electrical functions and of the circuits necessary for
the specific job (what you want to happen), and common sense
will make the system work the way you want It to work
See examples of typical wiring and instructions packed with
each magnetic switch.
IMPORTANT, PLEASE READ COMPLETELY
SWICHGAGE, Murphy magnetic switches and valves,
properly installed and maintained, are effective, work-ready
tools in any preventive maintenance program. For optimum
performance, check these tools periodically: look for frozen
pointers, kinked or worn tubing, broken wiring or loose
connections: close the contacts, then watch for expected
results. Replace any damaged or worn parts: clean and repair
as necessary. Murphy will repair or replace parts covered by
the Murphy two year limited warranty.
Check the wiring; it must be Correct and Complete: tight
connections, unbroken insulation, no accidental grounds,
do not run shut-down wires with ignition wiring.
Check all tubing and connections for leaks.
Mount magnetic switches and Murphy valves in an upright
position, to prevent moisture collection and shorting.
Cleaning Lexan Lenses: since many strong solvents and
cleaners can haze and permanently damage the clear poly-
carbonate lens on SWICHGAGE, please use one of the
solutions listed here: mild soap and water; mineral spirits;
white kerosene; VM&P naphtha; heptane; hexane; varsol No.
2; menthyl/isopropyl/isobutyl alcohols: 1 & 3 denatured
alcohols; freons TF & TE; petroleum ether (65C boiling pt.).
CAUTION: Many of these cleaners are
flammable. DO NOT USE when the
equipment is running or very hot. Keep
away from sparks and flame.