SERVICE MANUAL
WATER PUMP, THERMOSTAT & IDLER PULLEYS
Section 9
CLEANING, INSPECTION AND REPAIR
CLEANING
Clean the Fan Idler Pulleys as follows:
1.
Wash all parts in cleaning solvent to remove all
grease.
2.
Dry with compressed air.
3.
DO NOT spin bearing cones with compressed
air.
INSPECTION AND REPAIR
Inspect and Repair the Fan Idler Pulley with Front
and Rear Roller Bearing as follows:
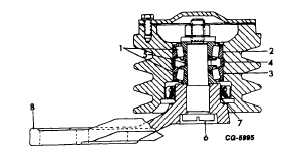
(Fig. 29)
1.
Visually inspect the bearing cones (1, Fig. 29) for
binding,
roughness,
overheating
or
other
damage. If the cones require replacement it is
necessary to also replace the bearing cups (2
and 3) and spacers (4 and 5).
2.
Visually inspect the bearing cups (2 and 3) inside
of the pulley hub for roughness, overheating or
other physical damage. If the cups require
replacement, replace the cones (1) and spacers
(4 and 5) also.
3.
Using a slide hammer with proper expander,
remove bearing cups from pulley hub. Remove
spacer (4) from groove in pulley hub. Check
bearing bore of hub for wear or damage.
Replace hub if necessary.
4.
Check pulley shaft (6) for cracks or thread
damage. If necessary to replace, cut it out of the
bracket (8). DO NOT damage the bracket.
Figure 29. - Fan Idler Pulley Assembly
1.
Bearing cone
5.
Spacer
2.
Bearing cup
6.
Pulley shaft
3.
Bearing cup
7.
Wear sleeve
4.
Spacer
8.
Bracket
REASSEMBLY AND INSTALLATION
Reassemble and Install the Fan Idler Pulley (with
Front and Rear Roller Bearing) as follows:
1.
Press shaft (11, Fig. 30) into bracket (12) until
head bottoms in bracket counterbore.
2.
Install spacer (7) in the groove of pulley hub.
3.
Press front bearing cup (6) into pulley bore until
it bottoms on spacer (7).
4.
While supporting the pulley by the front bearing
cup, press rear bearing cup (8) into pulley bore
until it bottoms on spacer (7).
5.
Install oil seal (9) (with lip facing out) flush with
pulley bore.
6.
Prepack area between seal (9) and bearing cup
(8) with I.H. 251H-EP grease.
CGES-185-3
PRINTED IN UNITED STATES OF AMERICA
Page 19