SERVICE MANUAL
CYLINDER HEAD & VALVES
Section 3
CLEANING, INSPECTION & REPAIR
Clean Cylinder Head as follows:
1.
Remove deposites from UPPER and LOWER
DECK of head. Pay special attention to
EXHAUST VALVE PORTS, VALVE SEATS,
INJECTION NOZZLE SLEEVES and WATER
DIRECTORS.
a.
Use non-caustic solvent and BRASS wire
brush to clean bores.
b.
Blow out carbon deposits with compressed
air after cleaning. Clean Valves as follows:
1.
Remove residue from VALVE SPRINGS, VALVE
HEAD, STEM and BORES of VALVE GUIDE.
a.
Clean with suitable solvent and a BRASS
wire brush.
b.
Lightly polish valve surface with extremely
FINE emery paper.
NOTE: DO NOT USE STEEL BRUSHES these will
scratch the surface and lead to valve failure.
Clean Valve Guides as follows:
NOTE: Valve guides must be thorougly cleaned
prior to valve installation. Preform valve guide bore
cleaning on: 1. New service valve guides. * 2.
Valve guides installed in new service cylinder heads.
3. Valve guides presently installed in cylinder head,
which meet bore specifications.
Failure to clean valve guide bore can cause premature
valve guide wear and in severe conditions, valve
breakage.
1.
Coat a nylon brush (which has a slightly larger
diameter than the l.D. of the valve guide) WITH
SOAP AND WATER.
2.
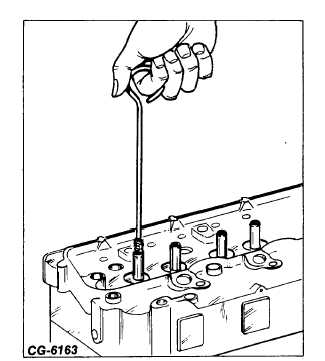
Insert brush Into I.D. of valve guide and with a
turning motion, run the brush through to insure
removal of gum, carbon, deposits and rust
preventive from the guide and spiral groove (See
Fig. 15).
Figure 15. - Cleaning Valve Guide Bores
3.
THOROUGHLY coat guide with clean engine oil
after cleaning operation is complete.
NOTE: When installing valves and retainers do not
use grease. Grease may stop the flow of lubricating
oil into the valve guide and cause valve guide wear.
*All valve guides furnished as service parts are reamed
to size; however, it is necessary to ream guides to
specified size after installation to remove any burrs or
slight distortion caused by the pressing operation. BE
EXTREMELY CAREFUL NOT TO REMOVE TOO
MUCH MATERIAL. Always clean guides after this
operation.
CGES-185-3
PRINTED IN UNITED STATES OF AMERICA
Page 15


