SERVICE MANUAL
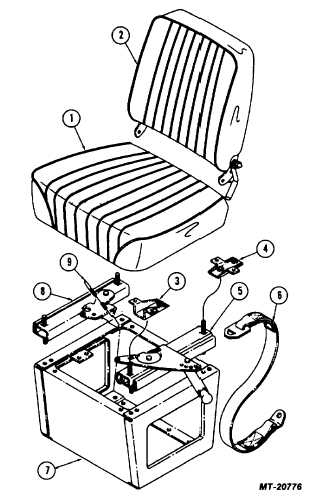
Fig. 29. Individual Drivers Seat - Custom Trim Exploded
View
Key
Description
1
Cushion, Seat Assembly
2
Cushion, Back with Support
3
Bracket, Seat Adjuster Front
4
Bracket, Seat Adjuster Rear
5
Adjuster with Handle, Seat Left
6
Belt, Seat
7
Riser, Seat
8
Adjuster, Seat, Right
9
Wire, Seat Adjuster
INDIVIDUAL DRIVERS SEAT (FIG. 29)
Individual
drivers
seats
are
similar
in
construction to the bench seat and have the same
adjustment
features
and
mechanisms.
Individual
passenger seats however are fixed in one floor position.
Removal and installation procedures which
follow apply to both the full width bench seat and the
individual drivers seat.
REMOVE
1.
Remove the four bolts which secure the upper
adjuster rails to seat bottom on right and left side
and detach seat and back assembly. Slide seat
fore and aft as necessary for access to mounting
bolts.
2.
Unlock seat adjuster wire between the two rails.
3.
Remove two bolts which secure lower half of
each seat adjuster to seat riser and remove right
and left seat adjusters.
4.
Clean seat adjusters as required. Apply a light
coat of multi-purpose lube (IH 251 HEP) to rails
to assure a smooth operation on reassembly.
Wipe away excess lube.
INSTALL
Seat installation procedure is the reverse of
removal. See Torque Chart for specified mounting
torques.
WINDSHIELD
The windshield used with the S-Series cab is
either one or two piece flat glass type depending on
whether cab is the 200 or 230 cm (80 or 90 inch) width
model. A molded weatherseal (weatherstrip) with either
an integral or detached insert fits perimeter of glass to
retain glass in windshield opening. Seam between
halves of two piece windshield is closed with inner and
outer division bars and seals. When replacing wind-
shield always use a new weatherseal since a used
weatherseal is likely to be stretched or deteriorated and
susceptible to leaks.
CTS-4065
PRINTED IN UNITED STATES OF AMERICA
Page 20